Summary: Half-Life and mods (CS, DOD, TFC, etc.) all use the same map format (.bsp). Maps can't be changed once they are compiled, but there is some map data that can easily be edited in any text editor (such as Notepad) without changing the compiled map - entities. Changing map entities allows you to modify the map heavily for use on a server, without requiring players to download anything.
On this page i will explain how to edit entities to:
and open up many new possibilities for your HL/mod server.
Downloads:
So far, a few people have attempted to make spawn point editor tools but most didn't work or were NOT for casual users. However recently one was released that seems to work pretty well. Read the information on this page and then give it a shot.
Download here: Half Life SpawnPointEditor
Jump to a section:
General Purpose Info - Using Ripent
Alternatives to Ripent
General Purpose Info - Entities
General Purpose Info - Map Coordinates
Editing Maps - Adding Spawns for Counter-Strike
Editing Maps - Converting Counter-Strike Map Types
Editing Maps - Converting Between Mods
Editing Maps - Adding a Banner
Editing Maps - Changing Class Restrictions in TFC Maps
Tips
More Information
Questions?
Other pages:
Map spawn test script
Server Command-line Options
External links:
mapping program downloads - includes spritefixer, sprite wizard, and sprite viewer (useful for adding banners)
In more detail:
Get ripent here: http://zhlt.info (80 KB). It was originally included at http://collective.valve-erc.com Zoner's Half-Life Tools but not anymore (check for other tools here: http://developer.valvesoftware.com/). Put it in the directory with the map you want to edit.
Note: ripent is several years old and some new programs have been made that do the same thing, but better. here is a good one: BSPEdit. If you use this or other alternaitves to Ripent, obviously you'll need to adapt the following ripent-specific instructions to that program.
Back up your map!
Go to a DOS command line. The easiest way to do this is to create a file in the same directory with the map and ripent.exe called command.bat.add this to it
command.com
Then just double-click the file and you should have a black window with a blinking cursor. If it just blinks and you don't have a new command window (usually happens on Windows NT or 2000), try this instead
cmd.exe
Now at the prompt type
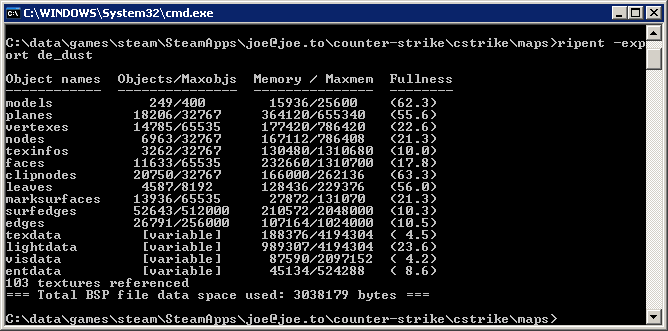
ripent -export yourmapname
e.g.
ripent -export de_dust
Most of the time you will get a table displaying the ripent output:
Some maps will give you an error:
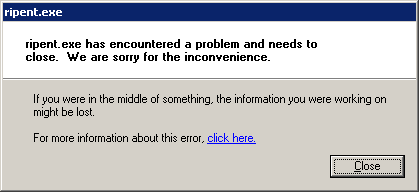
Hey, at least they are sorry for the inconvenience! If the map you want to edit gives you an error, you are out of luck with ripent. However, there are other possibilities (see alternatives to ripent, below).
If you didn't get an error, you should have a new file in the directory called yourmapname.ent (e.g. de_dust.ent). You can open it and start editing. Notepad will not understand the line breaks but you can use almost any other editor including Wordpad and Word.
When you are done just repeat the process using the -import argument
ripent -import yourmapname
e.g.
ripent -import de_dust
and yourmapname.bsp will contain your changes.
The entities are actually stored in cleartext in the BSP so even if you can't use ripent for some reason (most likely because you are on linux or the map you want to edit crashes ripent) you could try editing the map source code with a hex editor, or use the Stripper2 server plugin to handle your changes.
Entities in the .ent file will be enclosed in accents, also known as "curly brackets." Some examples:
{
"origin" "1494 -1385 -128"
"angle" "0 35 0"
"classname" "info_player_start"
}
{
"origin" "-96 384 384"
"_light" "128 128 255 130"
"pitch" "-60"
"angle" "339"
"classname" "light_environment"
}
{
"model" "*38"
"renderamt" "255"
"rendermode" "4"
"classname" "func_wall"
}
Notice:
they each start and end with an accent and they have one argument per line (the arguments can be in any order).
the origin argument contains three numbers - these are the X/Y/Z coordinates in the map. That's how you will position your new entities.
each entity has a classname - the classname is the type of entity
Each mod has it's own entities. You can find out more about an entity you find by looking for it on google.
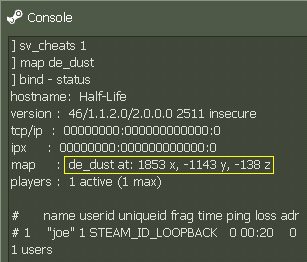
You'll have to spend your time in the maps finding the coordinates. The easiest way to do this is to start Half-Life and go to the console and type
sv_cheats 1
map yourmapname
bind - status (to show your location in console)
depending on the mod you might also type other commands such as
notarget (if it is a map with enemies)
god (never die)
impulse 101 (get all weapons)
mp_roundtime 10 (will give you 10 minutes to walk around before round ends)
mp_freezetime 0 (no delay at start of round)
sv_gravity 100 (to get to different areas faster)
Walk around the map and when you are in a relevant location hit - (or whatever key you bound status to), or you can also use adminmod on your server, if you have access to admin_userorigin. Type
admin_userorigin yourname
Then look in your console for the coordinates.
Or in 1.5:
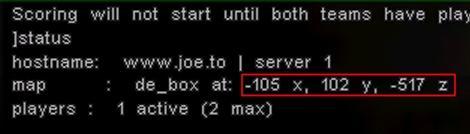
Then just write the coordinates down.
There are at least two other ways of getting coordinates which you may prefer.
You can try botman's BSP_view which allows you to scroll around in a map from windows and displays your coordinates on screen. this is the fastest way to get a rough location in a map, but it is useless for getting exact locations because you move too fast and you can go through walls, so it's impossible to tell if you are too close to any solid objects.
You can also try using winbspc to convert the .bsp to a .map file, which is viewable in worldcraft. this is the most accurate method and often the easiest but winbspc doesn't work on all maps.
Spawns must be 128 units (X, Y or Z) from each other. if a spawn point is closer than that, a player will die (telefrag) at the start of the round.
Spawns must be in the buyzone. Usually maps have a hard buyzone limit in a simple shape like a rectangle, so they are easy to plot out. Some maps don't have a buyzone described in the map, so each spawn will automatically create a little buyzone around it. If you are having trouble staying in the buyzone with all your spawns, create a spawn out of the buyzone in the middle of the map and test it. If there is a buyzone around your new spawn, you can put your spawns anywhere and they will all have buyzones.
Spawns much be at least 1 unit away from walls and other solid objects. I usually walk up to a wall, and crouch/walk away with a small tap of the move key to get as close to the wall as possible without touching it.
If you only have to move or add a single spawn point, you can just find the coordinates and add it. However, if you are adding 6 or more spawns i recommend erasing all the spawns and starting from scratch as most maps don't have enough room for you to safely add spawns without compressing the existing spawns into the smallest possible space. When you have enough (16 for each team is the maximum required but more won't cause any errors), you can make the entities. They should look like this:
CT Spawns
{
"origin" "1494 -1255 -128"
"angles" "0 0 0" <- optional
"classname" "info_player_start"
}
T Spawns
{
"origin" "-1361 -1470 -128"
"angles" "0 0 0" <- optional
"classname" "info_player_deathmatch"
}
VIP Spawns (1 required for AS type maps)
{
"origin" "344 -1608 320"
"angles" "0 0 0" <- optional
"classname" "info_vip_start"
}
The origin is the location of the spawn - as mentioned, 128 units from other spawns, in a buyzone, and not touching any solid objects.
The angles is the direction the player will be facing when he starts. It's not required but can be confusing without it on some maps. No one likes staring at a wall when they spawn.
The three classnames are the only difference between CT, T and VIP spawns.
If you run out of room you can actually stack people on top of each other by adding a spawn with a vertical displacement of at least 128 units, but this should be a last resort as it can be confusing for players to spawn with someone standing on their head.
The easiest way i have found to enter a lot of entities at once is to type in the numbers only, such as
0 0 128
0 0 256
0 0 384
0 128 0
0 256 0
0 384 0
128 0 0
256 0 0
384 0 0
(etc. ...)
Then i use Word's replace feature:
find what : ^p
replace with: "^p"angles" "0 0 0"^p"classname" "info_player_start"^p}^p{^p"origin" "
This will convert all the numbers into CT Spawn entities for you. Obviously you can replace the info_player_start with info_player_deathmatch for T spawns, and change the angles coordinates as necessary.
Remove all the spawns from the original entity file. When you have your word file full of new entities, paste it into the original file, import, and test. Make sure each spawn point can jump (to make sure it's not frozen) and is in a buyzone. If possible, test with 32 bots to make sure there are no telefrags, and that there are actually the right number of spawns. If you run the map on a server and people can't join a team after a certain number of players, you probably added the spawns to the bottom of the entity file and it isn't loading them all. add them near the top, right after the first worldspawn entity.
You don't have to modify some maps because they support 32 players by default. You can tell how many spawns a map has very easily in Windows with Gatez's Advanced Mapcycler - or in linux with grep - however, it will not tell you if the spawns are too close together or otherwise broken. You can try this simple VB script to test map spawns.
You can download many Counter-Strike map entities already modified by me at http://cs.joe.to/ents. Please send me any modifications you make to any maps so i can add them to that page. You can get all the default maps converted with DutchTiger's 32Player program, which includes entity files to convert all the default maps to 32 players.
The server determines what type of mission the map is from the entities. Thus there is almost no limit to how creative you can be when modifying maps. You can add or remove hostages, hostage rescue points, Bombsites, and VIP rescue points. Generally this is easier than adding spawn points because you only need to change a few entities instead of 32 or more.
You can use this to make unbalanced maps fairer for the losing team:
The best part is that players don't have to download anything - you just put the customized version on your server, and it automatically plays the map according to the entities you created.
Find all instances of these entities and remove them.
From DE maps remove
func_bomb_target
info_bomb_target (rarely used)
From AS maps remove
func_vip_safetyzone
info_vip_start
From CS maps remove
hostage_entity
info_hostage_rescue
Replace
"origin" "0 0 0"
with the actual X/Y/Z coordinates you mapped out for each entity.
For DE maps add
{
"origin" "0 0 0" <- change this to your location
"model" "*16"
"target" "tgt_a" <- you can add additional bombsites by changing the target name, e.g. tgt_a, tgt_b, tgt_c, etc.
"classname" "info_bomb_target"
}
For AS maps add
{
"origin" "0 0 0" <- change this to your location
"classname" "func_vip_safetyzone"
}
For each VIP rescue zone.
You need a spawn location for the VIP. Add this or change an existing info_player_start entity to info_vip_start
{
"origin" "0 0 0" <- change this to your location
"classname" "info_vip_start"
}
For CS maps add
hostages
{
"origin" "0 0 0" <- change this to your location
"model" "models/scientist.mdl" <- you can use any model, including a wine bottle, a chicken, even a helicopter!
"classname" "hostage_entity"
}
and rescue zones
{
"origin" "0 0 0" <- change this to your location
"classname" "info_hostage_rescue"
}
Add additional rescue zones as desired.
I can't give you exact instructions because it depends on the mod you are converting from and to, and the entities in those mods, but it is technically possible to play any map for any HL mod on any other mod. I personally have converted a Counter-Strike map (de_dust) to a Natural Selection map (ns_dust) and an ESF map to a CS map. Generally it's best to start with a simple map in each mod and compare entities to find out what's missing from the map in the other mod.
The way i went about it for the NS map was, i removed all the stuff that looked like it was CS-specific (bombsites, some models), and looked through a simple NS map to find all the required entities (not many, just spawns and some hive stuff). To do a good job you should be familiar with both the source and target mods because a lot of it is guesswork unless you are an experienced mapper.
The ESF map was very easy - ESF maps are just deathmatch arenas, so all i had to do was add CS-style spawns and it worked.
If players already have the map in the old mod, they will not have to download anything if they just copy the map to the new mod's maps directory.
First, you wil need a program to convert a windows bitmap (.bmp) into a sprite (.spr). See the mapping program downloads link near the top of this page. Then add this entity to the location in your map where you want your sprite to appear
{
"origin" "0 0 0" <- change this to your location
"scale" "1.0"
"model" "sprites/yourlogo.spr" <- change this to your sprite name
"rendercolor" "255 255 255"
"renderamt" "200" <- 0-255, 0 is transparent and 255 is opaque
"rendermode" "4"
"renderfx" "14"
"classname" "env_glow"
}
The meanings of some of the arguments are:
origin = location
model = the path/filename of your sprite file
renderamt = level of transparency
And rendermode, which has different values for different functions:
1 = Normal
2 = Pure Color. the object will be rendered as a pure area of whatever color is specified in FX Color. For models and sprites, this is the same as Normal mode.
3 = Texture. the object will be rendered without shadows. For models and sprites, this is the same as Normal mode, except that the Pulse renderfx settings work.
4 = Glow. like additive, but as the player gets further from the sprite, it gets progressively larger and more transparent. The sprite is also not obscured by intervening models, which can sometimes look bad. Alphatest sprites won't use their masks in this mode.
5 = Solid. this only affects textures beginning with {. Blue pixels will be transparent; non-blue pixels will be solid. For models, this mode is the same as Normal mode. For sprites, this mode is for displaying sprites in Indexalpha mode - i.e. the palette positions are used as opacity settings; 0 for fully transparent, and 255 for fully opaque, regardless of what the palette colors actually are. The only palette colour that will be used is the last one, which sets the colour for the whole sprite. (Needless to say, this will look odd unless the sprite is designed to be displayed this way!) Oddly, Alphatest sprites won't use their masks in this mode.
6 = Additive. Only bright parts of the object are visible; darker parts are just more transparent, and black is not drawn. Useful for making lighting or hologram effects.
There are different effects you can try. Here's a another page with more info - try experimenting. A sprite will normally float in the air and rotate to face the player. To post a sprite against a wall, switch byte number 8 in your .spr file from "02" to "03" with a hex editor. Or, (thanks to Mussolini HeadKick for this tip) you can try this: to place a banner against a wall, add the angles parameter:
"angles" "0 180 0"
Here's some information on adding a sprite from Robert 'Cilsh' Csapo
Well, with little time of studing the code i found the problem.

When you got a cfg with sprites on the map that's aint moving you are using
{
  classname/env_sprite
  PRECACHE_SPRITE(folder/name.spr)
  frame/1
  framerate/10
  renderfx/0
  rendermode/1
  renderamt/220
  scale/1.55
  spawnflags/1  // SF_SPRITE_STARTON
  model/sprites/folder/name.spr
  origin/1791 2049 195
}
for an example.

If you want to use an animation with sprite you need to edit the parameters.
{
  classname/env_sprite
  PRECACHE_SPRITE(folder/name.spr)
  frame/1 How many BMP is there in the sprite when you made it?
  framerate/10 Which framerate speed did you use when you created the sprite?
  renderfx/0
  rendermode/1
  renderamt/220
  scale/1.55
  spawnflags/1  // SF_SPRITE_STARTON
  model/sprites/folder/name.spr
  origin/1791 2049 195
}
When the parameters are complete, the sprite won't face you with the 02 or 03 in the hex editor :)
First Step - You will need to open your entity file (mapname.ent) with a text editor. I prefere to use wordpad because it generally keeps all of the code in order.
Second Step - Find the part of the code that looks similar to the following:
"maxammo_shells" "0"
In wordpad this can be done by holding ctrl and pressing the F key on your keyboard.
Third step - Changing class variables: The number zero in the string you see above is variable that is called a bit field value. The number placed in it's postition will determine which class(es) will/won't be available in the class selection menu for a specific map, if any. Immediately below is a list of the basic values for class limitations:
0 : no limits
-1 : civilian only
1 : no scout
2 : no sniper
4 : no soldier
8 : no demo man
16 : no combat medic
32 : no heavy weapons guy
64 : no pyro
128 : no random playerclass
256 : no spy
512 : no engineer
Some of you may be wondering how to limit more than one class in a map. This is very simple. Just add up the variables for the classes that you don't want to be available to players of your map, and place the sum in the position that is currently taken by our number zero. For example, to turn off demo man (8) and pyro (64) you would use 72.
Fourth Step - Save Your file. You should keep the filename the same unless you intend on doing something else with the origional source code (perhaps using it as a backup file).
Fifth Step - Import the entities into the map.
Sixth and final step - Place the new bsp in your Team Fortress maps directory. You may want to keep a backup of the origional map. This will prevent any stress that would arive in the event(s) of complications.
This is far longer than I expected it would be. I hope it was worth the time I put into it (which isn't much). Enjoy and happy map making.
-Xproterg
#1. Use the angle argument to face players the right way. The middle number is horizontal and the default value is 0
"angle" "0 0 0"
Let's say one team is facing the wrong way and you want to turn them around. Just find all their spawns and use 180 degrees to rotate them to face the opposite direction
"angle" "0 180 0"
#2. If you use Word to edit your entities, be sure it doesn't replace your straight quotes with "curly quotes" because curly quotes will not work in the map.
#3. The HL engine seems to have problems with loading any entities past the first 1024 listed. When adding new items, if the map is large or complex, you should add your new items to the beginning of the file, and make sure the entities at the end of the file are optional, such as lights, ambience, etc. - not switches or other essential map elements.
#4. You will find many interesting entities. For example you can add entities to strip weapons from players, add weapons to maps, add lighting effects, and add ambient sounds. Experiment.
Valve ERC Collective - a good place to get HL related mapping info
Google - where i learned 99% of the information here
You can email me at joe@joe.to but i would prefer if you asked me on the forums.
Thanks for reading and good luck!